Standard examples & course grades |
Adding email links |
Plus and minus signs |
APAS report |
Adding Powerpoint show |
Resume additions |
Limited storage space |
Editing the home page |
Securing transcript page |
Adding * to Standards |
Everything else you want to know! |
Updated
April 20, 2005
|
A: Since this is going to be your REAL efolio for the BOT, use REAL examples (grades). The Standards SHOULD appear in the left section when you click on "Standards" You can then choose the one you want to show proof of having done, and even attach a document to verify it.
How To:
In the admin mode:
1. Click on Content Tools
2. Click on standard you have chosen
3. Click it's "edit" button
4. You can either add text to the Intro section (make a new paragraph using the <p> code)
5. Or use the "Add Document" choice to enable viewer to download a copy of your work (ie, Word document (ends in .doc), Powerpoint (.ppt), etc)
6. Remember to click "Finished" or "Apply" to save changes
Another option would be to include your email addrsss in the Resume section,
with the "Contact Info" section. In that case:
Go to to Resume section and select Contact Info. Edit the "Contact Information"'s
Section Intro as shown above.
A: Click on them and see! (These are the subsections - when you click on the plus or minus again, they disappear)
A: APAS (Academic Progress Audit System) is a computerized report which provides helpful information about your degree and course requirements. Since your APAS is pretty well protected behind your UofM ID and password, you probably don't want to give it out. But you can go to this registrar site and go to "Generate an APAS report" and then Generate a pdf version of the report, which you can save and upload as a document to efolio. Then use efolio's "Edit" and Attachments: Document to create a link to that pdf document.
PowerPoint Show
Q: I uploaded my powerpoint presentation to the standard that
I am using and was wondering if it was supposed to run as a slideshow on
its own or the person who looks at it has to click on the slideshow to make
it run?? Right now I uploaded it as a document, but I was wondering if I was
supposed to upload it as something else?? --LS
A: If uploaded as a .ppt file, it will download on their computer as a "normal" Powerpoint Presentation. Powerpoint CAN be saved "for the web," but that version loses transitions, some sounds, etc. and isn't nearly as effective.
Q: The only problem I had with the program was with uploading my projects because the site only gives you 3MB. I wanted to put some pictures on my efolio, so with the space they took up I was left with no room for uploading Powerpoint or Inspiration documents. --GB
A: The 3 MB is a limiting factor but you can put such files on your UofM website and create a link to them from within efolio. For example, you might FTP your PPT file to the UofM server (doesn't need an HTML page) It's URL would then be: http://www.tc.umn.edu/~username/filename.ppt and you make the URL link to it in efolio.
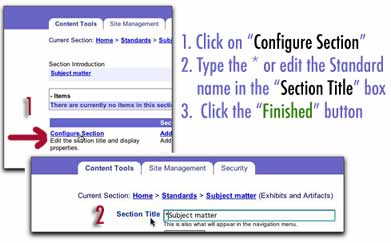
Identifying Standards Completed
Q: How do I get the asterisk to show up on my standard. I have
it so it shows up when you click on assessment, but not on the side bar. How
do I fix it? --KL
A: To identify or edit the ten standard titles (like identifying those completed with an asterisk), first click on the + by the word "Standards." Choose the Standard you want. Then:
MAKING A LINK FROM EFOLIO TO YOUR FILE ON THE SERVER |
ADD YOUR NAME TO THE BANNER |
INSERTING LINE BREAKS and FORMATTING on the MAC |
CREATING A NEW SECTION IN EFOLIO |
||
IMAGES - Why don't the images that I added show up? |
Saving your e-folio web site to disk.... |
|
Adding AUDIO Files |
(*courtesy of Christine
Greenhow) back to top of page |
MAKING A LINK FROM EFOLIO TO YOUR FILE ON THE SERVER
After you put a document to your server space, you then need to make a link
from efolio to it. So, if I put a word doc to my server space, say named
chris.doc, I then need to make a link from efolio to http://www.tc.umn.edu/~greenhow/chris.doc
and then it can be downloaded. That is same with movies and web sites.
Steps to adding a related link in eFolio to your files on the UMN server:
1) In Admin mode, go to the page in eFolio that you want the link to the file to appear on, such as Standards/Subject Matter. Create a Related Link like you would to link to a website.
Next, click Add Related Link
2) In Internet Explorer or the web browser you’re using, click File/ New/ Window so that you can type in your web server address (such as http://www.tc.umn.edu/~greenhow/)
3) Find the file you want to connect to and type its name in the URL address line (such as http://www.tc.umn.edu/~greenhow/eFolio_Tips.doc) then copy and paste this URL into the “Link URL” box within Related Links on your eFolio page. Click Finished.
When you test it in Live Site, it should send you to the file.
Other resources
1) Use simple HTML code. For example, notice the <p> in the text I typed below:
Objectives: To obtain a position teaching middle school science in an urban area
< p> Education: B.A. University of Minnesota-Twin Cities, 2002 </p>
Inserting the "<p>" and the "</p>" around the text above will create a paragraph break between area and Education.
Here are some simple HTML commands you can use to preserve formatting on the MACs
< b>Your Words here </b> will make "Your Words here" BOLD
< i>Your Words here </i> will make "Your Words here" ITALIC
< u> Your Words here </u> will make "Your Words here" UNDERLINED
< p>Your Words here </p> will create a line break and new paragraph
To create a bulleted list, use the following and insert your text.
< ul>
< li>text</li>
< li>text</li>
< li>text</li>
< /ul>
FOR MORE BASIC HTML
2) Use a program such as Dreamweaver software (which is on
the Peik Hall MACs) to type your text. Then convert it to the HTML code view
(where HTML code is generated for you) and copy the HTML code and paste it
into efolio box in Admin mode.
Unfortunately, Cutting and Pasting of text from a word processor does
not bring the formatting with it, which is why you should cut and paste
the
above text
once you’ve got it the way you want it to look in Dreamweaver.
In newer versions of AppleWorks, you can create html text for cutting
and pasting. Choose Save As -> "File Format - HTML." Close the document, reopen
it, and cut and paste ONLY that lines/lines of text you wish. (This according
to eFolio people. I haven’t tried it).
Further Tips Do NOT press "Shift-Enter," as
that may cause certain versions of the software to hang.
Back to Topics
| Adding a new user to your account The most common reason for adding a new user to your account is that you wish to provide access to a section of your web site that has been set to "Private" in the "Configure Section". For example, let's say you have a "Reference" section of your web site that you want to put behind a login screen. Here are the steps you would use: 1. Go your your "Reference" section and click on "Configure Section". 2. In "Section Access" change "Public" to "Private" 3. Click on "Save" 4. Click on the "Security" tab 5. Click on "Users" 6. Click on "Add New Item" 7. Put in the requested information and click on "Save" 8. Then click on the "Off" button in order to make it "On". 9. Click on "Permissions" 10. Under the "View" column click in the box next to your "Reference" section. 11. Click on "Save" and you are done. |
CREATING A NEW SECTION IN EFOLIO
You may want to design a section of your eFolio to be used with future
or present students or for your professional development.
Here are the steps for creating a subsection:
1. Click on the "Content" tools
2. Select and click on which section you want to house you new subsection.
3. Under "Section Tools" click on "Add Subsection".
4. Put in your "Title"
5. Under "Section Type" decide whether you want the new subsection
to be "Internal" or "External" - an external
section is one where they would leave your portfolio.
6. Select what "Data Type" you would like to use. Think of data types
as templates to select from. The most common ones used by individuals in adding
subsections are "Basic", "Online Form" and "Polling"
7. Click on "Finished" to save your work.
You can now start working with your new subsection.
Back to Topics
AUDIO FILE - How do I add an audio file to one of my Efolio pages?
Login to the /admin portion of your Efolio. This will require you
to enter your User Name and password. Find the section that you want
to
add a video
file to and click on that section name. You then have two choices.
You can click on blue “Edit” link to the right of the
section introduction or you can click the blue “Add an Item” button.
Whichever method you chose you will see a blue box area at the left-hand
side of the page. If you chose “Add
an Item”, giving the Item a ‘Headline’ is a required
field. Find “Audio” and click on it. You need to have the
audio file somewhere accessible on your computer. Use the browse function
to find the audio file
and click on it. Once the file shows up in the text box, click the
gray, “Upload” button.
When the audio file has been uploaded make sure you click the green “Finished” button.
Finally, if you added the audio file as an ‘Item’, make
sure that you turn the item ‘On’.
Back to Topics
Why don't the images that I added show up?
There are two reasons that this might happen. The first reason is that you did not click the green “Finished” button when you added the image. The second reason is a bit more complicated and has to do with default settings in the Configure Section page. Find the page you wanted the image added to, and click on the “Configure Section” link about half-way down the page on the left. Find the “Summary Images” field and make sure it is set to “On”.